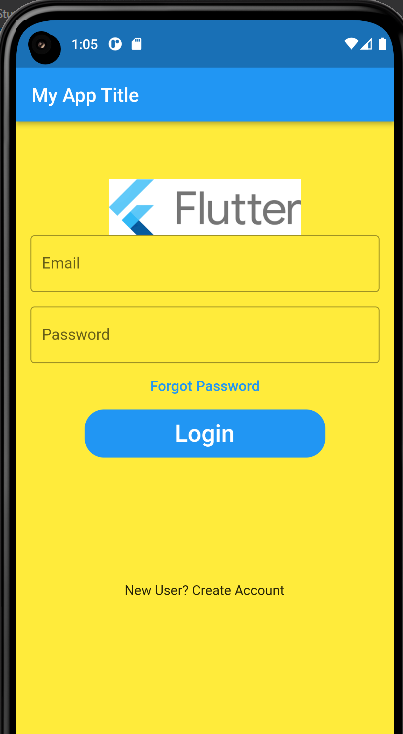
Login Screen 1
-
Steps
1. minimal code
                          import 'package:flutter/material.dart';
                          import 'package:get/get.dart';


                            class LoginScreen extends StatelessWidget {


                              @override
                              Widget build(BuildContext context) {
                                return MaterialApp(
                                  debugShowCheckedModeBanner: false,
                                  title: 'Flutter Demo',
                                  home: Scaffold(
                                    backgroundColor: Colors.yellow,
                                    appBar: AppBar(title: const Text("Login Page")),
                                    body: SafeArea(
                                        child: Column(


                                        )
                                    ),
                                  ),
                                );
                              }


                            }
We have used Column() widgets to place the logo, email , password, buttons and text link in a vertical array 2. Add logo
1. Let us add children: [] for placing multiple widgets in the Column()
@override
  Widget build(BuildContext context) {
    return MaterialApp(
      debugShowCheckedModeBanner: false,
      title: 'Flutter Demo',
      home: Scaffold(
        backgroundColor: Colors.yellow,
        appBar: AppBar(title: const Text("My App Title")),
        body: SafeArea(
            child: Column(
                children: [


                ]
            )
        ),
      ),
    );
  }
2. add image widget to the children[]
Output@override Widget build(BuildContext context) { return MaterialApp( debugShowCheckedModeBanner: false, title: 'Flutter Demo', home: Scaffold( backgroundColor: Colors.yellow, appBar: AppBar(title: const Text("My App Title")), body: SafeArea( child: Column( children: [ Image.asset('assets/flutterlogo.png',width:200), ] ) ), ), ); } 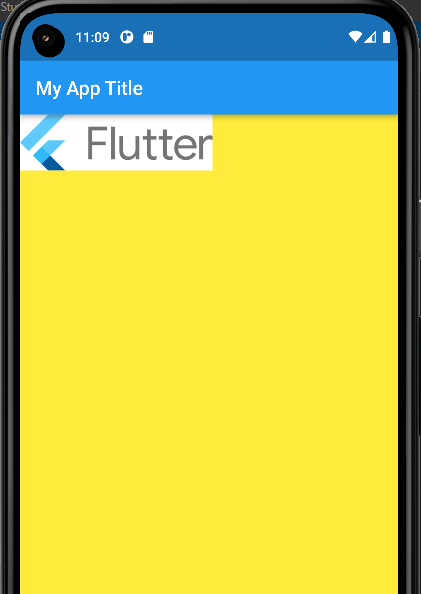
ISSUE: Note that the logo image is not center to the screen
3. align the logo to the center
1. center align property is not allowed in the Image() widget
2. use center() widget for aligning the widget to center
3. write the Image() widget as the child of the center()
Output@override Widget build(BuildContext context) { return MaterialApp( debugShowCheckedModeBanner: false, title: 'Flutter Demo', home: Scaffold( backgroundColor: Colors.yellow, appBar: AppBar(title: const Text("My App Title")), body: SafeArea( child: Column( children: [ Center( child:Image.asset('assets/flutterlogo.png',width:200), ) ] ) ), ), ); } 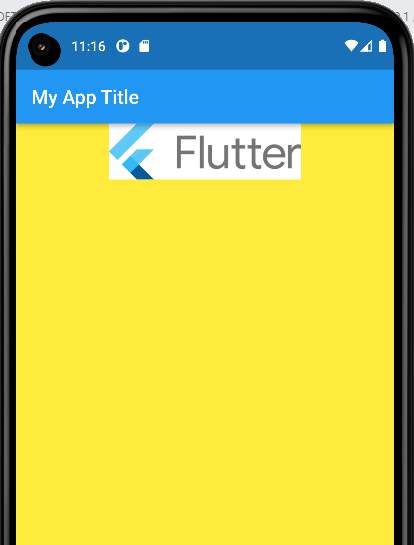
ISSUE: As per the design, logo is away from the top of the screen
4. add top padding
1. padding property is not allowed in Image() widget and Center() widget
2. use Padding() or Container() for appling padding
3. write the Center() widget as the child of the Padding() widget
output@override Widget build(BuildContext context) { return MaterialApp( debugShowCheckedModeBanner: false, title: 'Flutter Demo', home: Scaffold( backgroundColor: Colors.yellow, appBar: AppBar(title: const Text("My App Title")), body: SafeArea( child: Column( children: [ Padding( padding: const EdgeInsets.only(top: 60.0), child: Center( child:Image.asset('assets/flutterlogo.png',width:200), ) ) ] ) ), ), ); } 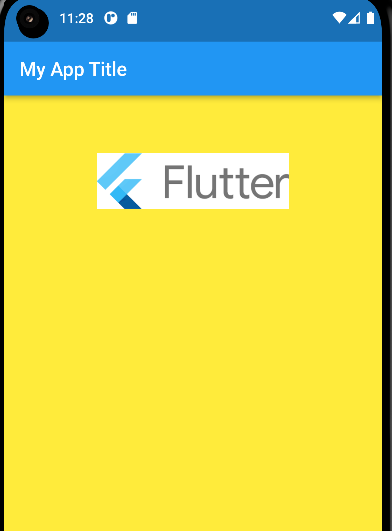
3. Add Email textbox
1. let us add a TextField() widget to the children[]
output@override Widget build(BuildContext context) { return MaterialApp( debugShowCheckedModeBanner: false, title: 'Flutter Demo', home: Scaffold( backgroundColor: Colors.yellow, appBar: AppBar(title: const Text("My App Title")), body: SafeArea( child: Column( children: [ Padding( padding: const EdgeInsets.only(top: 60.0), child: Center( child:Image.asset('assets/flutterlogo.png',width:200), ) ), TextField( decoration: InputDecoration( border: OutlineInputBorder(), labelText: 'Email', hintText: 'Enter valid email id as abc@gmail.com'), ) ] ) ), ), ); } 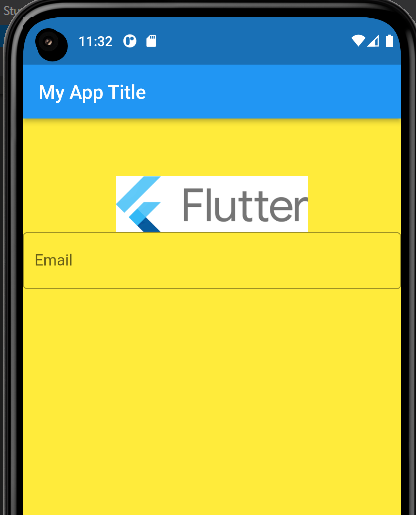
ISSUE: As per the design , there is some sorrounding space between the widgets and screen
2. add padding
1. padding property is not allowed in TextField() widget
2. use Padding() for applying padding
3. write the TextField() as the child of Padding() widget
output@override Widget build(BuildContext context) { return MaterialApp( debugShowCheckedModeBanner: false, title: 'Flutter Demo', home: Scaffold( backgroundColor: Colors.yellow, appBar: AppBar(title: const Text("My App Title")), body: SafeArea( child: Column( children: [ Padding( padding: const EdgeInsets.only(top: 60.0), child: Center( child:Image.asset('assets/flutterlogo.png',width:200), ) ), Padding( //padding: const EdgeInsets.only(left:15.0,right: 15.0,top:0,bottom: 0), padding: EdgeInsets.symmetric(horizontal: 15), child: TextField( decoration: InputDecoration( border: OutlineInputBorder(), labelText: 'Email', hintText: 'Enter valid email id as abc@gmail.com'), ), ) ] ) ), ), ); } 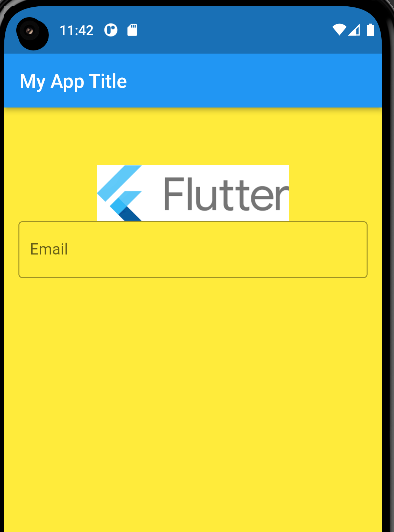
4. Add Password textbox
1. let us add the password widget to the children
output@override Widget build(BuildContext context) { return MaterialApp( debugShowCheckedModeBanner: false, title: 'Flutter Demo', home: Scaffold( backgroundColor: Colors.yellow, appBar: AppBar(title: const Text("My App Title")), body: SafeArea( child: Column( children: [ Padding( padding: const EdgeInsets.only(top: 60.0), child: Center( child:Image.asset('assets/flutterlogo.png',width:200), ) ), Padding( //padding: const EdgeInsets.only(left:15.0,right: 15.0,top:0,bottom: 0), padding: EdgeInsets.symmetric(horizontal: 15), child: TextField( decoration: InputDecoration( border: OutlineInputBorder(), labelText: 'Email', hintText: 'Enter valid email id as abc@gmail.com'), ), ), TextField( obscureText: true, decoration: InputDecoration( border: OutlineInputBorder(), labelText: 'Password', hintText: 'Enter secure password'), ), ] ) ), ), ); } 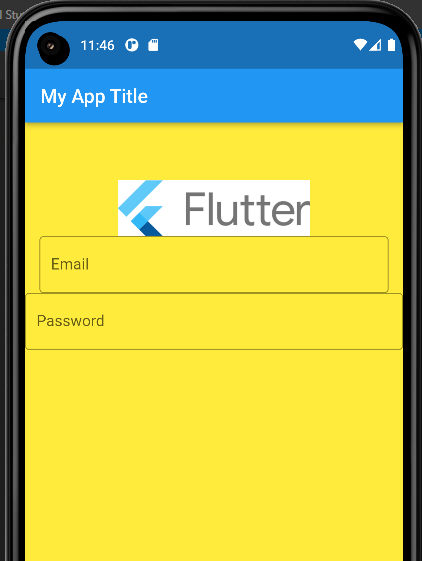
ISSUE: As per the design , there is some sorrounding space between the widgets and screen
2. add padding
1. padding property is not allowed in TextField() widget
2. use Padding() for applying padding
3. write the TextField() as the child of Padding() widget
output@override Widget build(BuildContext context) { return MaterialApp( debugShowCheckedModeBanner: false, title: 'Flutter Demo', home: Scaffold( backgroundColor: Colors.yellow, appBar: AppBar(title: const Text("My App Title")), body: SafeArea( child: Column( children: [ Padding( padding: const EdgeInsets.only(top: 60.0), child: Center( child:Image.asset('assets/flutterlogo.png',width:200), ) ), Padding( //padding: const EdgeInsets.only(left:15.0,right: 15.0,top:0,bottom: 0), padding: EdgeInsets.symmetric(horizontal: 15), child: TextField( decoration: InputDecoration( border: OutlineInputBorder(), labelText: 'Email', hintText: 'Enter valid email id as abc@gmail.com'), ), ), Padding( padding: const EdgeInsets.only( left: 15.0, right: 15.0, top: 15, bottom: 0), child: TextField( obscureText: true, decoration: InputDecoration( border: OutlineInputBorder(), labelText: 'Password', hintText: 'Enter secure password'), ), ), ] ) ), ), ); } 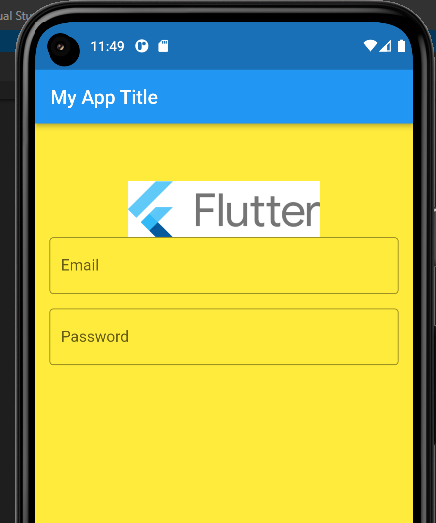
5. Add 'Forgot Password ' link
Let us add FlatButton() widget to the children
output@override Widget build(BuildContext context) { return MaterialApp( debugShowCheckedModeBanner: false, title: 'Flutter Demo', home: Scaffold( backgroundColor: Colors.yellow, appBar: AppBar(title: const Text("My App Title")), body: SafeArea( child: Column( children: [ Padding( padding: const EdgeInsets.only(top: 60.0), child: Center( child:Image.asset('assets/flutterlogo.png',width:200), ) ), Padding( //padding: const EdgeInsets.only(left:15.0,right: 15.0,top:0,bottom: 0), padding: EdgeInsets.symmetric(horizontal: 15), child: TextField( decoration: InputDecoration( border: OutlineInputBorder(), labelText: 'Email', hintText: 'Enter valid email id as abc@gmail.com'), ), ), Padding( padding: const EdgeInsets.only( left: 15.0, right: 15.0, top: 15, bottom: 0), child: TextField( obscureText: true, decoration: InputDecoration( border: OutlineInputBorder(), labelText: 'Password', hintText: 'Enter secure password'), ), ), FlatButton( onPressed: (){ //TODO FORGOT PASSWORD SCREEN GOES HERE }, child: Text( 'Forgot Password', style: TextStyle(color: Colors.blue, fontSize: 15), ), ), ] ) ), ), ); } 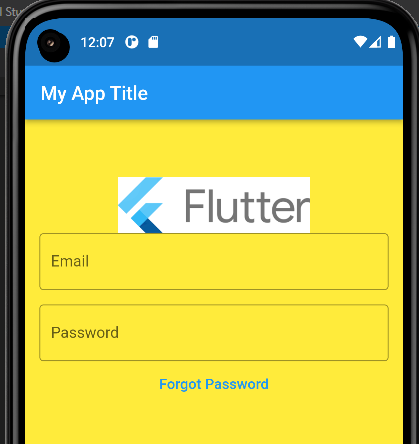
6. Add 'Login' button
1. Let us add FlatButton() to the children[] array
output@override Widget build(BuildContext context) { return MaterialApp( debugShowCheckedModeBanner: false, title: 'Flutter Demo', home: Scaffold( backgroundColor: Colors.yellow, appBar: AppBar(title: const Text("My App Title")), body: SafeArea( child: Column( children: [ Padding( padding: const EdgeInsets.only(top: 60.0), child: Center( child:Image.asset('assets/flutterlogo.png',width:200), ) ), Padding( //padding: const EdgeInsets.only(left:15.0,right: 15.0,top:0,bottom: 0), padding: EdgeInsets.symmetric(horizontal: 15), child: TextField( decoration: InputDecoration( border: OutlineInputBorder(), labelText: 'Email', hintText: 'Enter valid email id as abc@gmail.com'), ), ), Padding( padding: const EdgeInsets.only( left: 15.0, right: 15.0, top: 15, bottom: 0), child: TextField( obscureText: true, decoration: InputDecoration( border: OutlineInputBorder(), labelText: 'Password', hintText: 'Enter secure password'), ), ), FlatButton( onPressed: (){ //TODO FORGOT PASSWORD SCREEN GOES HERE }, child: Text( 'Forgot Password', style: TextStyle(color: Colors.blue, fontSize: 15), ), ), FlatButton( onPressed: () { }, child: Text( 'Login', style: TextStyle(color: Colors.white, fontSize: 25), ), ), ] ) ), ), ); } 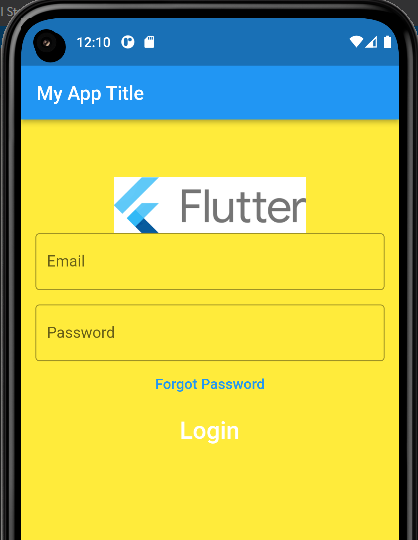
ISSUE: as per the design , login is a button
2. apply button style to the login button
1. add Container()
2. apply decoration: property to the container()
output@override Widget build(BuildContext context) { return MaterialApp( debugShowCheckedModeBanner: false, title: 'Flutter Demo', home: Scaffold( backgroundColor: Colors.yellow, appBar: AppBar(title: const Text("My App Title")), body: SafeArea( child: Column( children: [ Padding( padding: const EdgeInsets.only(top: 60.0), child: Center( child:Image.asset('assets/flutterlogo.png',width:200), ) ), Padding( //padding: const EdgeInsets.only(left:15.0,right: 15.0,top:0,bottom: 0), padding: EdgeInsets.symmetric(horizontal: 15), child: TextField( decoration: InputDecoration( border: OutlineInputBorder(), labelText: 'Email', hintText: 'Enter valid email id as abc@gmail.com'), ), ), Padding( padding: const EdgeInsets.only( left: 15.0, right: 15.0, top: 15, bottom: 0), child: TextField( obscureText: true, decoration: InputDecoration( border: OutlineInputBorder(), labelText: 'Password', hintText: 'Enter secure password'), ), ), FlatButton( onPressed: (){ //TODO FORGOT PASSWORD SCREEN GOES HERE }, child: Text( 'Forgot Password', style: TextStyle(color: Colors.blue, fontSize: 15), ), ), Container( height: 50, width: 250, decoration: BoxDecoration( color: Colors.blue, borderRadius: BorderRadius.circular(20)), child: FlatButton( onPressed: () { }, child: Text( 'Login', style: TextStyle(color: Colors.white, fontSize: 25), ), ), ), ] ) ), ), ); } 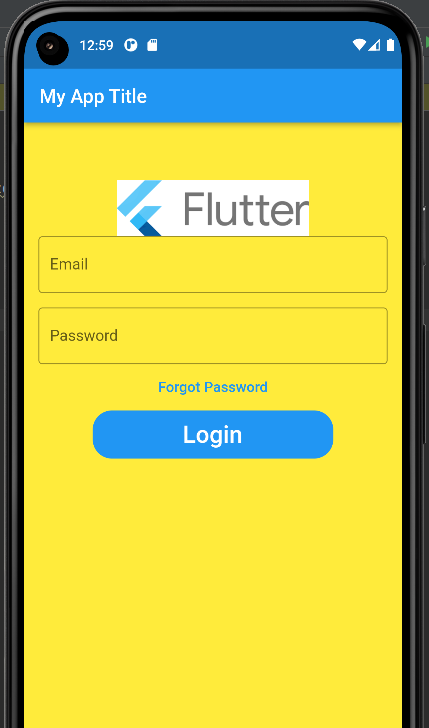
7. Add 'New user? Create Account' text
1. Let us add Text() to the childrens[] array
output@override Widget build(BuildContext context) { return MaterialApp( debugShowCheckedModeBanner: false, title: 'Flutter Demo', home: Scaffold( backgroundColor: Colors.yellow, appBar: AppBar(title: const Text("My App Title")), body: SafeArea( child: Column( children: [ Padding( padding: const EdgeInsets.only(top: 60.0), child: Center( child:Image.asset('assets/flutterlogo.png',width:200), ) ), Padding( //padding: const EdgeInsets.only(left:15.0,right: 15.0,top:0,bottom: 0), padding: EdgeInsets.symmetric(horizontal: 15), child: TextField( decoration: InputDecoration( border: OutlineInputBorder(), labelText: 'Email', hintText: 'Enter valid email id as abc@gmail.com'), ), ), Padding( padding: const EdgeInsets.only( left: 15.0, right: 15.0, top: 15, bottom: 0), child: TextField( obscureText: true, decoration: InputDecoration( border: OutlineInputBorder(), labelText: 'Password', hintText: 'Enter secure password'), ), ), FlatButton( onPressed: (){ //TODO FORGOT PASSWORD SCREEN GOES HERE }, child: Text( 'Forgot Password', style: TextStyle(color: Colors.blue, fontSize: 15), ), ), Container( height: 50, width: 250, decoration: BoxDecoration( color: Colors.blue, borderRadius: BorderRadius.circular(20)), child: FlatButton( onPressed: () { }, child: Text( 'Login', style: TextStyle(color: Colors.white, fontSize: 25), ), ), ), Text('New User? Create Account') ] ) ), ), ); } 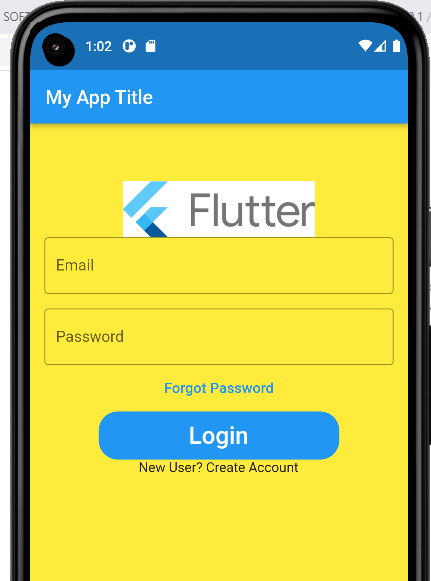
ISSUE: as per the design , New User? Create Account is placed at bottom
2. Place the text at bottom
Add SizedBox() widget
output@override Widget build(BuildContext context) { return MaterialApp( debugShowCheckedModeBanner: false, title: 'Flutter Demo', home: Scaffold( backgroundColor: Colors.yellow, appBar: AppBar(title: const Text("My App Title")), body: SafeArea( child: Column( children: [ Padding( padding: const EdgeInsets.only(top: 60.0), child: Center( child:Image.asset('assets/flutterlogo.png',width:200), ) ), Padding( //padding: const EdgeInsets.only(left:15.0,right: 15.0,top:0,bottom: 0), padding: EdgeInsets.symmetric(horizontal: 15), child: TextField( decoration: InputDecoration( border: OutlineInputBorder(), labelText: 'Email', hintText: 'Enter valid email id as abc@gmail.com'), ), ), Padding( padding: const EdgeInsets.only( left: 15.0, right: 15.0, top: 15, bottom: 0), child: TextField( obscureText: true, decoration: InputDecoration( border: OutlineInputBorder(), labelText: 'Password', hintText: 'Enter secure password'), ), ), FlatButton( onPressed: (){ //TODO FORGOT PASSWORD SCREEN GOES HERE }, child: Text( 'Forgot Password', style: TextStyle(color: Colors.blue, fontSize: 15), ), ), Container( height: 50, width: 250, decoration: BoxDecoration( color: Colors.blue, borderRadius: BorderRadius.circular(20)), child: FlatButton( onPressed: () { }, child: Text( 'Login', style: TextStyle(color: Colors.white, fontSize: 25), ), ), ), SizedBox( height: 130, ), Text('New User? Create Account') ] ) ), ), ); }